|
A Word About Design
What matters more than anything else in a throwing knife is
durability. A few minutes' practice will convince you of this. A
thrown knife absorbs a lot of punishment, especially when it
doesn't stick; that ringing blang! when a knife hits sideways or
handle-first is something you have to get used to. Steel that is
tempered too hard will develop cracks, or simply break without
warning. Fragile handles, guards, and narrow points will tend to
disintegrate pretty quickly under the stress of throwing.
Just about everybody starts throwing with a knife he didn't
make, sometimes casually with a hunting or kitchen knife (that
seldom lasts long), sometimes with one of the numerous commercial
throwing knives on the market. Don’t get me wrong: I have
nothing against store-bought throwing knives. But I believe that
you'll soon develop ideas of your own about what a throwing knife
should look like. Maybe you'll search the cutlery catalogs and
sporting goods stores for a knife that fills the bill. Maybe
you'll find it. But when you see what it costs, and reflect that
good practice calls for two, three, six, or more knives, you'll
start thinking in terms of Homemade And Proud Of It. When you do,
come back to this site. Your home-built knives will cost less than
commercial models, and they'll give you more satisfaction,
because, in fact, they'll be custom-made.
Making Your Own Knives
Now don't complain that you aren't handy with metal-working
tools. Neither am I. All you need to make first-rate throwing
knives are a supply of flat steel stock of the right dimensions, a
vise, a hacksaw, a file, and a bench grinder with one medium stone
and one wire brush wheel. If you intend to drill holes in your
knife, you'll need an electric drill and a bit.
First, draw a full-size knife pattern on paper. For
symmetrical designs, fold the paper lengthwise, pencil the design
on one half of the paper, and cut out along the pencil line. Then
unfold, and there's your perfectly symmetrical pattern.
It's a good idea to assess your paper pattern by gripping it
as if it were steel. If a blade is too wide (anything over two
inches will be awkward to throw by the blade) or a handle too
narrow, if the general appearance doesn't please you, cut some
more paper and try again; paper cuts easier than steel. You can
even determine the balance-point with a paper pattern: just mark
the center and balance the pattern across your index finger
exactly as if it were metal. Be careful that you don't get so
intrigued with patterns that you never get around to the steel at
all. This can happen.
When your pattern is satisfactory, carefully glue it to the
metal stock you intend to use for making your knife, and hacksaw
around the edge of the paper. Small-radius curves where a hacksaw
won't reach can be finished with the grinder or file.
A point about elaborate designs: At the paper pattern stage,
it's fun to add flamboyant shapes and prongs. At the hacksawing
stage, complex outlines become less appealing. Many a fancy
curlicue winds up angrily sawn off and kicked into a corner.
Generally speaking, simple shapes and straight lines will be
easier to make, especially in quantity. Also, it’s a common
occurence for a knife to strike another knife that's already
sticking in the wood. Projecting guards will make this happen
oftener than you'd like. Take note that the knives thrown by
professionals usually have very simple, smooth profiles, to reduce
the chance of on-target collisions.
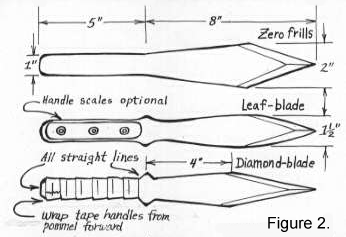
 The
illustrations (Figures 1. and 2. -ed.) show some designs for
throwing knives that work well, some chiefly for handle throwing,
some for blade throwing, some for throwing by either handle or
blade. They can be sawn out of quarter-inch (6.35 mm) cold-rolled
steel, edged quickly with a bench grinder, and used without
further muttering or shuffling. The
illustrations (Figures 1. and 2. -ed.) show some designs for
throwing knives that work well, some chiefly for handle throwing,
some for blade throwing, some for throwing by either handle or
blade. They can be sawn out of quarter-inch (6.35 mm) cold-rolled
steel, edged quickly with a bench grinder, and used without
further muttering or shuffling.
While you're still experimenting, this is a good enough way
to go. However, plain cold-rolled steel will make rather
unbeautiful knives, and they'll bend a bit too easily. A more
satisfying procedure is to start with higher-grade steel and
harden the finished product just enough to provide some
resiliency. Key stock is a good choice, since it can be bought in
practically any dimensions. A thickness of 3/16", or 7/32"
(~ 5 to 6 mm) is enough when working with tempered steel, because
of its greater strength compared to cold-rolled steel.
After cutting out the basic profile, grind the edges, smooth
your saw-cuts and grinds with a file, buff the surfaces to a satin
polish with a wire wheel, and have your finished knives heat
treated to the right degree of hardness (ca. Rockwell 30 to 40) by
a good metals shop. Explain to these professionals exactly what
your needs are, and provide them with information on the type of
steel you're working with; don't be shy about requesting just the
right temper for throwing knives; metals people love a challenge.
After heat treating, the knives may require a final
polishing, again with a wire wheel, to a smooth satin finish.
Avoid giving them a high polish, as this tends to become clammy
from the sweat of your hand, and will stick when the knife is
released during throwing. (Some buckskinners even leave their
throwing knives file-roughened, to increase the friction between
blade and target. This helps keep knives from falling out of the
wood during competitions.)
Another approach to knife making, one
that appeals to growing numbers of hobbyists, is to buy steels
already tempered to the correct degree of springiness, work them
by cutting and grinding, and bypass the heat treating step
altogether. Consult with other hobbyists (the good old internet is
tailor-made for this) to locate suppliers, determine the best
choice of steels, and exchange experiences.
Remember that when it comes to the best temper for throwing
knives, soft and springy is better than hard and brittle. A knife
that bends a little can be straightened (lay it on the ground and
step on it), but a knife that broke is junk.
About handles on throwing knives: Most professional knife
throwers don't bother with them, first to reduce expense, and
second because handles tend to break. But for us amateurs, there's
something unsatisfying about calling a simple steel blank a knife.
Also, throwing with a handle grip is sometimes more comfortable if
the bare tang of the knife is helped out with some kind of
material.
Remember that durability is the most important feature of a
throwing knife. This means that riveted grips are a bit chancey;
rivets can crystalize and break, and many handle materials are too
brittle to withstand the shock of throwing. On the other hand,
riveted handles look classy and give a knife a substantial feel.
If you want to try riveted handles, use large steel rivets -- a
3/16" shank is not too big. Make your grip scales from
vulcanized rubber or some other slightly flexible material, to
cushion the rivets from blows and from the vibration that causes
crystalization. Heavy cape leather comes in thicknesses up to a
quarter-inch, if you need a traditional material, say to make your
knife acceptable in a buckskinners' competition. Leather is not as
resilient as rubber, but has some of the same shock-absorbing
properties.
If you want a non-riveted handle for your knife, try thin
scales of leather fastened with epoxy. Leather is durable, cheap
(if you can’t locate a supply of cape leather, an old shoe
can provide big enough scraps for this purpose), and easily
worked. Roughen the suface of the tang with a file before applying
the glue, and clamp the whole assembly tightly during curing.
Finish the leather to a smooth but not highly polished texture, to
assure a smooth release when throwing with a handle grip. Should
you maintain your leather grips with saddle soap and oil dressing?
Of course!
Note that the illustrations shows handle scales stopping
short of the end of the knife's tang; they’re also narrower
than the width of the tang, by a small amount. This is so that
when the wrong part of the knife hits the target, the handle
scales don't take the direct shock of impact.
Even if you don't require grips on your knife, it's a good
idea to paint the tang a bright color. This gives the appearance
of a handle, adds a bit of flash to your throwing, and makes the
knife easier to find when it lands in grass or sand. A single
layer of adhesive tape serves the same purpose, but this will have
to be replaced pretty frequently as it gets torn and dirty. Wrap
the tape starting at the pommel and moving toward the hilt (see
illustration) to avoid lifted edges that can interfere with a
smooth release when throwing with a handle grip.
 If
you don't throw with a handle grip, a bright cloth or cord
wrapping makes a handsome touch. Here, you can allow yourself a
few flourishes with dangling tassels or ribbons (the illustration
suggests some possibilities) as long as these don't create too
much aerodynamic drag. Shucks, everybody likes to decorate his
weapons. If
you don't throw with a handle grip, a bright cloth or cord
wrapping makes a handsome touch. Here, you can allow yourself a
few flourishes with dangling tassels or ribbons (the illustration
suggests some possibilities) as long as these don't create too
much aerodynamic drag. Shucks, everybody likes to decorate his
weapons.
Sharp edges are something to avoid in a throwing knife.
First, they aren't necessary, particularly if your knife is
adequate in weight; thirteen or fourteen ounces of steel pack
enough authority to penetrate well, even if a knife is only
moderately keen. Second, a sharp throwing knife is a menace to
yourself and bystanders; a ricochet could result in serious
injury. Third, a sharp knife is difficult to throw using a blade
grip. Finally, a sharp edge won't survive the rough treatment of
throwing for very long, so why bother with one in the first place?
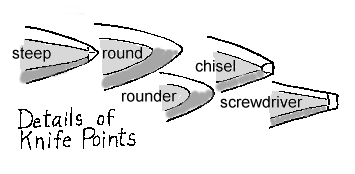 Even
a super-sharp point is unnecessary, for the reasons given above.
Note the detailed drawing of the last inch or so of the point.
This shows how the angles of the point can steepen at the very
end, to achieve durability without sacrificing penetration. This
last quarter-inch of the point is the part that does the work of
sticking. Keep it free of burrs and bends, and it'll do everything
asked of it. Even
a super-sharp point is unnecessary, for the reasons given above.
Note the detailed drawing of the last inch or so of the point.
This shows how the angles of the point can steepen at the very
end, to achieve durability without sacrificing penetration. This
last quarter-inch of the point is the part that does the work of
sticking. Keep it free of burrs and bends, and it'll do everything
asked of it.
Professionals, who must be concerned with safety, sometimes
use knives with slightly rounded points (see illustration). These
will penetrate softwood boards perfectly well when thrown with a
vertical grip, but are less likely to inflict dangerous wounds if
they accidentally hit someone. A chisel- or screwdriver-type point
can also be used. These have the advantage of not breaking or
bending easily.
The illustration shows how the edges of most throwing knives
are ground: Short, steep, and extending only two or three inches
back from the point. Full-length edges, if left dull for safety,
are perfectly all right too, particularly for looks, and will make
it easier to adapt your throwing knife to cutting purposes if you
ever need to. (For example, knives used for throwing competitions
at muzzle-loading jamborees must have one full-length edge.) If
your hand is small (mine is), removing some extra steel by
grinding edges can make a knife easier to throw with a blade grip.
|