|
 When
I was a boy, I thought "a proper target" meant somebody
else's tree. Even in rural Wyoming that was a bit much, and it
still is. A proper target is made out of materials that belong to
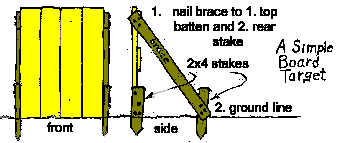
you, period. Almost invariably, this means wood. The illustration
shows a simple type of free-standing target made from planks. A
stand-alone target of this type is more work and expense to build,
but it makes the target easier to move. This basic target-board of
planks and battens can be fastened to a tree or post, or even (if
you're the owner) the side of a building. The planks used for the
target should be as thick as you can find (three inches is not too
much), and should be held together with a minimum number of nails.
Scrap lumber will cost less than new. Try to get planks with as
few knots as possible. Softwoods are the only suitable type of
wood: pine, spruce, fir, and the like. (Complete plans and
instructions for building a first-rate board target and frame can
be found in Gil Hibben’s 1994 The Complete Knife Throwing
Guide, published by United Cutlery.) When
I was a boy, I thought "a proper target" meant somebody
else's tree. Even in rural Wyoming that was a bit much, and it
still is. A proper target is made out of materials that belong to
you, period. Almost invariably, this means wood. The illustration
shows a simple type of free-standing target made from planks. A
stand-alone target of this type is more work and expense to build,
but it makes the target easier to move. This basic target-board of
planks and battens can be fastened to a tree or post, or even (if
you're the owner) the side of a building. The planks used for the
target should be as thick as you can find (three inches is not too
much), and should be held together with a minimum number of nails.
Scrap lumber will cost less than new. Try to get planks with as
few knots as possible. Softwoods are the only suitable type of
wood: pine, spruce, fir, and the like. (Complete plans and
instructions for building a first-rate board target and frame can
be found in Gil Hibben’s 1994 The Complete Knife Throwing
Guide, published by United Cutlery.)
A permanent frame for supporting targets
can be made out of two-inch pipe sunk in concrete, after the
manner of an old-fashioned clothesline standard. If you're
satisfied with where your target is located, this is a good way to
go. But don't be in a hurry to commit yourself to a permanently
emplaced target frame. You'll find that always throwing in the
same location can make you narrow-minded. A change of target and
throwing range will broaden your skills, and keep you from getting
stereotyped. Then too, if you mean to go in for competition,
you'll have to be able to throw in all sorts of places. So move
your target(s) around from time to time, and stay loose. Your
plank target should be at least three feet wide and six feet high.
Yes, I know that's a lot of lumber, but you'll need that big an
area for all the throwing you'll do. You should be able to stick
your knives at waist-, ankle-, or head-height, to the right and to
the left. A skimpy target will leave you hunting in the grass for
knives that missed altogether. Remember too that a large target
will take a long time to wear out. The battens holding the planks
together can be removed and the planks shuffled or reversed to
present fresh surfaces. Replacing a plank will only be an
occasional chore.
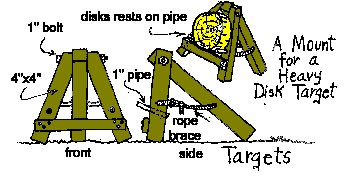
 If
you can get them, thick disks sawn from trees make excellent
targets, especially for tomahawks and axes, since disks are
durable and the end grain is easily penetrated. Tree disks are
also heavy, and you'll need some pretty sturdy carpentry to mount
them. The illustration shows a type of mount popular with
buckskinners. If
you can get them, thick disks sawn from trees make excellent
targets, especially for tomahawks and axes, since disks are
durable and the end grain is easily penetrated. Tree disks are
also heavy, and you'll need some pretty sturdy carpentry to mount
them. The illustration shows a type of mount popular with
buckskinners.
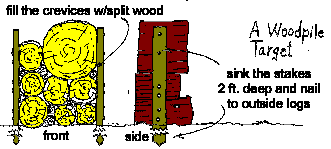
 If large tree disks are hard to come by, you can build up a
woodpile-type target using plain unsplit stobs of firewood. This
will have the disadvantage of leaving crevices a knife can fly
through, but mebbe that'll make ye toss more carefuller. What kind
of trees? Softwoods are good, willow is best, oak and maple are
too hard. A tip about leaving your wooden targets out in the rain:
Go right ahead. Wetting the wood will soften it and make
penetration easier, while the swelling will tend to heal the cuts.
In dry climates, you may even want to wet the target down with a
hose, especially if the wood is a bit tightgrained.
Targets don't have to be made of wood,
although this is usually the most satisfying material. Sheets of
ordinary corrugated cardboard can be layered and held together
with duct tape or cellophane tape to form a good if perishable
target. Use twelve or fifteen layers of carboard. Because they are
light, cardboard targets should be mounted on some sort of solid
backing, such as a sheet of plywood, and supported firmly by a
frame or post. A good target for light knives and spikes can be
made from styrofoam insulation. This material comes in large
sheets, 4 feet by 8 feet by 2 inches. It cuts easily with a
utility knife. Two layers make a thick target that will absorb
hundreds of hits. One sheet of foam can be cut into two pieces 4
feet on a side; these are taped together and then to a plywood
backing sheet. The final assembly can be hung on a garage or
basement wall – but protect that wall with some old carpeting
or fiberboard. You’d be surprised how often you can miss even
a 4-foot-square target.
Now I'm going to give you a suggestion
that will probably make you groan: Build two targets, and set them
up in a place where you can safely throw at both. Building two
targets means twice the work and expense, but it's worth the
effort. Two targets will double your practice time. Instead of
throwing, walking to the target to retrieve your knives, and then
walking back to your mark to throw again, you can throw to the
first target, retrieve, turn, and throw to the second target. Do
the two targets have to be identical? Shucks no. One should be a
full-size target of the type descibed above, and the other can be
some sort of novelty target, to keep you on your toes.
A Place to Throw Normally, knife
throwing is practiced outdoors, because of the need for plenty of
room. A grassy lawn is the best and pleasantest place to plant
your target, provided nobody minds a bit of scuffing; the
continual walking back and forth to the target will wear a path.
Perhaps a better surface for a throwing range is wood chips or
fine sand. In any case, avoid terrain with rocks in it, and NEVER
throw on concrete! Weeds and underbrush must be cleared away
thoroughly, and kept away. A knife can bounce into the strangest
places, and hide for keeps if given half a chance. Even rank grass
can hide a burrowing knife. I've walked many a mile to and fro
over a small piece of ground looking for a blade that chose to
slide under some unmown grass.
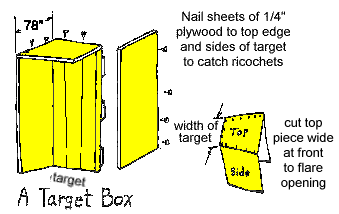
 If you can afford it, a light wire mesh or even burlap backstop,
set up a few feet behind the target(s) can do wonders to keep
stray knives at home, and will increase safety. A "throwing
box" can be built around your target with a few sheets of
light plywood (see illustration) which will catch almost all
ricochets. Level ground is nice but not absolutely necessary.
Sometimes it's fun to throw uphill or down, or while standing on a
slope. There: that’s why you want at least one movable
target. Safety is the most important consideration in setting up a
throwing range. I grew up in such a lonely place that hardly
anyone ever happened by, and so I seldom attracted onlookers when
practicing, but most of us live in settled places, and that means
spectators. That solid plonk! plonk! of knives sticking draws
small boys of all ages from blocks around. An admiring audience
(and people do admire even modest knife-throwing skill) will tend
to crowd closer and closer, and MUST be kept back out of range of
ricochets or bad throws. It's wise to position your target in such
a way that people and pets can't easily get behind it. It's best
to throw inside an enclosed area such as a fenced back yard. If
you're throwing in an unfenced area, say an empty lot, and if
onlookers are a frequent problem, try stringing tape on light
stakes to mark out a safety area, and ask people (not just
children) to stay on the other side. You should exercise the same
kind of care when throwing with friends. The enthusiasm of a
shared hobby, and the excitement of competition, can trick anyone
into being careless. Eye protection for all hands is a sound
precaution. The greatest danger when throwing knives is from
ricochets. These are unavoidable. They pose the greatest threat to
the thrower himself. If a knife bounces off the target and seems
to be headed your way, DON'T try to catch it or bat it out of the
air. The best tactic is to turn away from the knife and duck. This
will present the least vulnerable (if not the least tender) parts
of your body to the missile.
|

 When
I was a boy, I thought "a proper target" meant somebody
else's tree. Even in rural Wyoming that was a bit much, and it
still is. A proper target is made out of materials that belong to
you, period. Almost invariably, this means wood. The illustration
shows a simple type of free-standing target made from planks. A
stand-alone target of this type is more work and expense to build,
but it makes the target easier to move. This basic target-board of
planks and battens can be fastened to a tree or post, or even (if
you're the owner) the side of a building. The planks used for the
target should be as thick as you can find (three inches is not too
much), and should be held together with a minimum number of nails.
Scrap lumber will cost less than new. Try to get planks with as
few knots as possible. Softwoods are the only suitable type of
wood: pine, spruce, fir, and the like. (Complete plans and
instructions for building a first-rate board target and frame can
be found in Gil Hibben’s 1994 The Complete Knife Throwing
Guide, published by United Cutlery.)
 If
you can get them, thick disks sawn from trees make excellent
targets, especially for tomahawks and axes, since disks are
durable and the end grain is easily penetrated. Tree disks are
also heavy, and you'll need some pretty sturdy carpentry to mount
them. The illustration shows a type of mount popular with
buckskinners.
  If large tree disks are hard to come by, you can build up a
woodpile-type target using plain unsplit stobs of firewood. This
will have the disadvantage of leaving crevices a knife can fly
through, but mebbe that'll make ye toss more carefuller. What kind
of trees? Softwoods are good, willow is best, oak and maple are
too hard. A tip about leaving your wooden targets out in the rain:
Go right ahead. Wetting the wood will soften it and make
penetration easier, while the swelling will tend to heal the cuts.
In dry climates, you may even want to wet the target down with a
hose, especially if the wood is a bit tightgrained.
 If you can afford it, a light wire mesh or even burlap backstop,
set up a few feet behind the target(s) can do wonders to keep
stray knives at home, and will increase safety. A "throwing
box" can be built around your target with a few sheets of
light plywood (see illustration) which will catch almost all
ricochets. Level ground is nice but not absolutely necessary.
Sometimes it's fun to throw uphill or down, or while standing on a
slope. There: that’s why you want at least one movable
target. Safety is the most important consideration in setting up a
throwing range. I grew up in such a lonely place that hardly
anyone ever happened by, and so I seldom attracted onlookers when
practicing, but most of us live in settled places, and that means
spectators. That solid plonk! plonk! of knives sticking draws
small boys of all ages from blocks around. An admiring audience
(and people do admire even modest knife-throwing skill) will tend
to crowd closer and closer, and MUST be kept back out of range of
ricochets or bad throws. It's wise to position your target in such
a way that people and pets can't easily get behind it. It's best
to throw inside an enclosed area such as a fenced back yard. If
you're throwing in an unfenced area, say an empty lot, and if
onlookers are a frequent problem, try stringing tape on light
stakes to mark out a safety area, and ask people (not just
children) to stay on the other side. You should exercise the same
kind of care when throwing with friends. The enthusiasm of a
shared hobby, and the excitement of competition, can trick anyone
into being careless. Eye protection for all hands is a sound
precaution. The greatest danger when throwing knives is from
ricochets. These are unavoidable. They pose the greatest threat to
the thrower himself. If a knife bounces off the target and seems
to be headed your way, DON'T try to catch it or bat it out of the
air. The best tactic is to turn away from the knife and duck. This
will present the least vulnerable (if not the least tender) parts
of your body to the missile.
